How To Set Up Your Own Blog (for free, in under an hour)
Introduction and Overview
If you’re reading this you (probably) want to make your own blog, but don’t know where to start because coding is intimidating and you don’t know how to do it. Great news, you don’t need to have any experience to read and follow along!
If you do have a ton of technical experience, this blog post probably isn’t for you. I’m not sharing any novel blogging techniques, just the basics explained in the most beginner-friendly way possible.
Step 0 - Setting up GitHub
(I’m letting you in on a little programmer inside joke here by starting with “Step 0”. Computers start counting at 0, not 1, so often when programmers talk to eachother we will start our counting at 0 to pretend we are computers)
You might have heard of GitHub before, it’s the worlds most popular place to store and share code. It’s kind of like Google Drive, but for developers. One of the many cool features of GitHub is that they’ll host a website for you, for free! (As long as the website is simple enough, which is great because we don’t want to make a complicated website anyways.)
- Head to github.com and make an account.
- Once you’ve made your account, click the plus button in the top right corner and select “New Repository” from the dropdown:
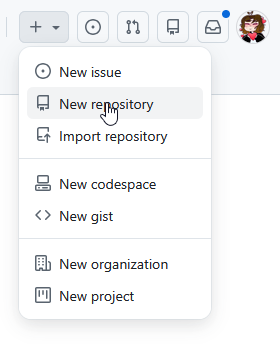
A repository is fancy GitHub-speak for a big folder. Right now, you’re creating the repository that will store all the code and content for your website. You can call this whatever you want, but I’m going to call mine “blog”
- You can leave every other field alone and click “Create Repository”
Step 1 - Installing Prerequisites
Next, we need to install a couple pieces of software.
Ruby
The first thing we’re installing is called Ruby. Ruby is a programming language (like Python or JavaScript, if you’ve heard of those) and we need it because it’s what was used to develop Jekyll, the next thing we’re installing.
- To install Ruby, select and follow the install instructions for your operating system here
Note that these instructions will expect you to use your computers terminal. You can open this by searching “terminal” on your computer (on Windows, it is called “command prompt” but will still show up when you search for terminal)
Some of the commands you’ll be asked to run are kind of long, and some things are spelled strangely - don’t forget you can copy-paste!
Jekyll
Next, we need to install Jekyll. Jekyll is a “static site generator” which basically means it will turn a text file we write in plain English into all the code needed for it to show up as a website.
- Now you have Ruby installed, run the following command:
gem install jekyll bundler
(you might need to reopen your terminal for this to work)
🎉 You now have Jekyll installed! That was easy, wasn’t it?
Git
We’re almost done, the last thing we need to install is Git. Git is something called “version control software.” Version control is exactly what it sounds like, it makes it easier to keep track of the different versions of a project, and what changed between those versions.
If you’ve ever worked on a group project, and had to send all kinds of files back and forth, all named silly things like Untitled Document_final_revision-3_final_final(6).docx and it was impossible to keep track of and really frustrating and stressful? Git was invented to solve this problem.
Git has a lot of advanced features, but we don’t need to use them to run a blog, so I won’t be teaching you them. The important part is it’s what we need to use to put our blog’s files on GitHub. (Now you know what Git is, the name “GitHub” might make a little more sense - it’s a hub for storing projects organized using Git)
Windows
- Run the following command in your terminal:
winget install --id Git.Git -e --source winget
If this doesn’t work (likely because you are on a version of windows older than Windows 10) you will need to follow the directions here - I recommend using the “Standalone Installer”
MacOS
Most versions of MacOS come with Git preinstalled, so you likely don’t need to do anything! You can check this by running git --version in your terminal. If you see some output like “git version (a bunch of random numbers)” you’re good to go!
If Git didn’t come preinstalled, first install homebrew, then run:
brew install git
Linux
You can install Git through your distribution’s package manager. Follow the instructions for your distribution here
Not sure your distribution? It’s probably “Debian/Ubuntu” and you can install Git using apt.
Step 2 - Setting Up Your Blog
🎉 Great work getting through all that installation!
Now you have everything you need, we can get started on the fun part!
First, you will need to clone your repository from GitHub. “Cloning” is a fancy Git word for “downloading” - this is how we get your (currently empty, we’re about to fix that) project from GitHub’s servers onto your computer.
- In your terminal, run
git clone https://github.com/[your username]/blog
(if you called your repository something other than blog, replace it with that. You can also copy-paste the URL from your browser. For the purposes of this tutorial I’m going to assume you named it blog in subsequent steps)
This will create a new folder, called blog. Navigate your terminal inside that folder with the following command:
cd blog
cd is an acronym for “Change Directory” and is how you move through folders using the terminal. Running cd is the same thing as double-clicking a folder to open it in your file explorer!
Now you’re inside the blog folder, run the following command:
jekyll new .
(don’t forget the period at the end, it’s important!)
After that, run
bundle exec jekyll serve
After a second or two, you should see the following:
Server address: http://127.0.0.1:4000/
Server running... press ctrl-c to stop.
🥳You just made your own website!!!🥳
Head to http://localhost:4000 to check it out. If it looks familiar, that’s because this is the exact same way I set up my site.
Note that the URL for your website is localhost - this means it’s running just on your computer, and nobody else can see your website yet. This is fine for now, and it’s helpful to have this version to tweak and test things before posting them publicly.
Step 3 - Simple Customization
Running that jekyll new . command created a bunch of files. You can change those files to customize every aspect of your site.
If you want to open your files in something that isn’t the terminal, you can run the following command to open it in your operating system’s file explorer:
- Windows:
explorer . - MacOS:
open . - Linux
xdg-open .
Just like with the jekyll command earlier, note the . at the end. In the terminal, . is shorthand for the current folder. There are other special
In the folder that just opened, look for a file called _config.yml. You can open this in any text editor. I recommend Visual Studio Code but anything works, really!
_config.yml is the main configuration file for Jekyll. Helpfully, Jekyll’s developers have added comments explaining what most of the different settings mean. There are a lot more than just these available, if you really want to you can read about all the options here.
You can also remove options, if you don’t want to set something (for example removing the email line if you don’t want your email shown)
If you’re curious, you can see the _config.yml for my website here.
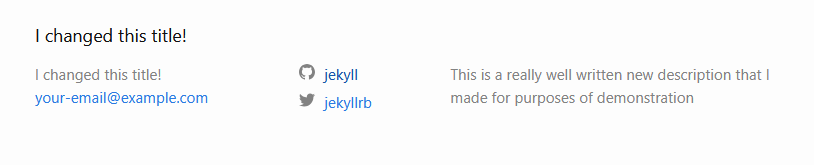
- Change the values of
titleanddescription, then save the file
You’ll need to restart Jekyll to see your changes (this is only true when changing _config.yml, making other changes will auto-update)
- Go back to your terminal, and press
ctrl+Cto stop the server. (MacOS:⌘+C)
(Depending on your OS, you might need to press ctrl+C twice.)
ctrl+C is the “stop” command for the terminal. It’s like clicking the red x on an application you don’t want open anymore.
- Just like before, start Jekyll by running
bundle exec jekyll serve
See your changes live:
Step 4 - Your First Post
Now you have a blog, you can start writing posts!
Inside your blog folder, there’s a subfolder called _posts - in case you didn’t figure this out already, this is where your posts are stored. Jekyll has helpfully created a file in there to use as a starting point.
Let’s take a look at that file:
_posts/2026-03-31-welcome-to-jekyll.markdown
---
layout: post
title:  "Welcome to Jekyll!"
date:   2026-03-31 23:27:30 -0500
categories: jekyll update
---

You’ll find this post in your `_posts` directory. Go ahead and edit it and re-build the site to see your changes. You can rebuild the site in many different ways, but the most common way is to run `jekyll serve`, which launches a web server and auto-regenerates your site when a file is updated.

Jekyll requires blog post files to be named according to the following format:

`YEAR-MONTH-DAY-title.MARKUP`

Where `YEAR` is a four-digit number, `MONTH` and `DAY` are both two-digit numbers, and `MARKUP` is the file extension representing the format used in the file. After that, include the necessary front matter. Take a look at the source for this post to get an idea about how it works.
Right away, you probably noticed this file is full of a bunch of random symbols. That’s because it’s written in a language called Markdown. I lied to you earlier when I said Jekyll let us write posts “in plain English.” I’m sorry 😢
Markdown
Markdown is a special format for writing text with formatting. It’s how we can write things in **bold** or _italics_,
- - add bullet points,
embed [links](https://example.com),
and more!
If this feels familiar, that’s because it’s used by lots of social media websites (like Reddit and Discord) - you’ve probably used markdown before without even realizing it!
Markdown TL;DR
You can make text bold by surrounding it with double asterisks **like this**
You can make text italics by surrounding it with underscores _like this_
- You can make
- lists by adding
- a dash before a line
- like this
You can make “block quotes” by starting a line with a “greater than” symbol
> like this
You can make headings by starting a line with a hashtag
# like this
You can also make sub headings by increasing the number of hashtags
## like this
You can keep adding hashtags to make things even smaller
### like this
If you want to link somewhere, surround what you want the link text to say in square brackets, and the link destination in parenthesis. [like this](https://example.com)
Images are very similar to links, you just add an exclamation mark at the start 
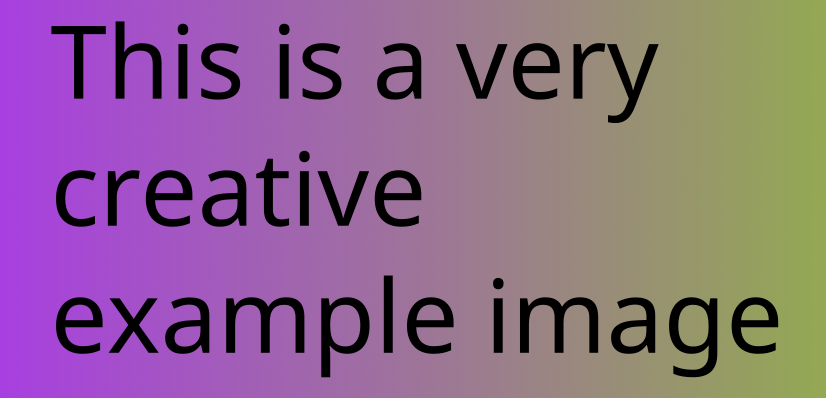
(the text in between the brackets becomes “alt text” which is very helpful for accessibility, for instance if someone is using a screen reader. Read more about alt text)
If you are for whatever reason really really excited to learn more about the different markdown syntax (it’s ok, I’m not one to judge) you can read more here. You can also see the markdown source for this post here.
Frontmatter
If you look back at that “welcome to jekyll” markdown file from above, there’s one more thing that looks weird. It’s probably off your screen by now, so I’ll paste it here for you:
---
layout: post
title:  "Welcome to Jekyll!"
date:   2026-03-31 23:27:30 -0500
categories: jekyll update
---
This is something called “frontmatter”. It’s a way for you to store different properties about your post, in the post itself. The most common ones are included here, and I’m not going to go into detail because understanding frontmatter isn’t a high priority thing for you to learn right now.
Point is, just copy paste this at the top of every post you write, and change the title, date, and categories to whatever you like.
(categories is optional, you can delete that line if you don’t want to tag your posts)
Step 4.5 - Actually Writing Your First Post
Good work getting through all that, you’ve earned a fun writing break.
- In the
_postsfolder, Make a new file in the formatYYYY-MM-DD-slug.md
A “slug” is a fancy word for “summarize your title in a couple words and use dashes instead of spaces” - for example, the slug for this post is blog-howto.
- Copy-paste the frontmatter from above, change
titleanddateand start writing! As you write, you can refresh your site (http://localhost:4000, if you lost it) to see how your post looks on the actual site. - Write as much or as little as you want, then come back here when your post is done (or at least good enough to publish to the internet, if you’re too impatient to finish writing)
Step 5 - Making Your Blog Public
There are a couple technical things to do before you can publish. It’s nothing you can’t handle, though! I’m going to speed through most of it, since many of these things you will only ever need to do once.
- In your
blogfolder, there’s a file called.gitignore, add the following line:Gemfile.lock
Your .gitignore file should look like the following:
_site
.sass-cache
.jekyll-cache
.jekyll-metadata
vendor
Gemfile.lock
If you can’t find the .gitignore file, it’s most likely because you need to turn on a setting called “show hidden files” - the exact name of it is different depending on your operating system, but searching “show hidden files [OS name]” should get you on the right track.
- Next, delete the file called
about.markdown
If you want, you could also use this opportunity to write an about page instead of deleting it. Up to you!
Next up, we need to run a couple git commands. Remember git?
git config --global user.name "Your Name"git config --global user.email "your@email.com"
The information you set here will be shared publicly - if you want to use a pseudonym, now’s your chance.
If you don’t want to give your real email address, GitHub has auto-generated one for you. You can view it on https://github.com/settings/emails under the “Keep my email address private” section.
- In your terminal, run
git add . - next, run
git commit -m "commit message"
(you can edit the commit message to be whatever you want, but keep in mind it will be publicly viewable. Good commit messages are short summaries of what changed since the last commit, for instance “Add Blog Tutorial Post”)
These two commands create a “checkpoint” of everything in your blog folder. Next, we’re going to “push” (upload) that checkpoint to GitHub.
To push, we need to log your terminal in to GitHub. There are a lot of different ways to do this, but the easiest is with the GitHub CLI.
- Follow the GitHub CLI installation instructions
- Then run
gh auth loginand follow the prompts- Select “HTTPS” as your preferred protocol for Git operations
- answer “yes” when asked to authenticate Git with your GitHub credentials.
- Once authenticated, run
git pushfrom yourblogdirectory This will upload all the files in your folder to the repository you created all the way back in step 0. - Open your GitHub repository in your browser, you should see all your files uploaded
We’re almost there! Now we just need to configure GitHub to host our site.
- Click Settings
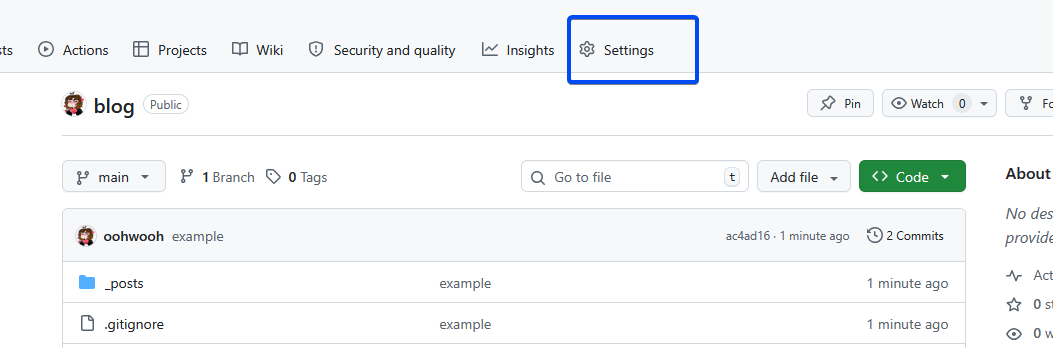
- then Pages
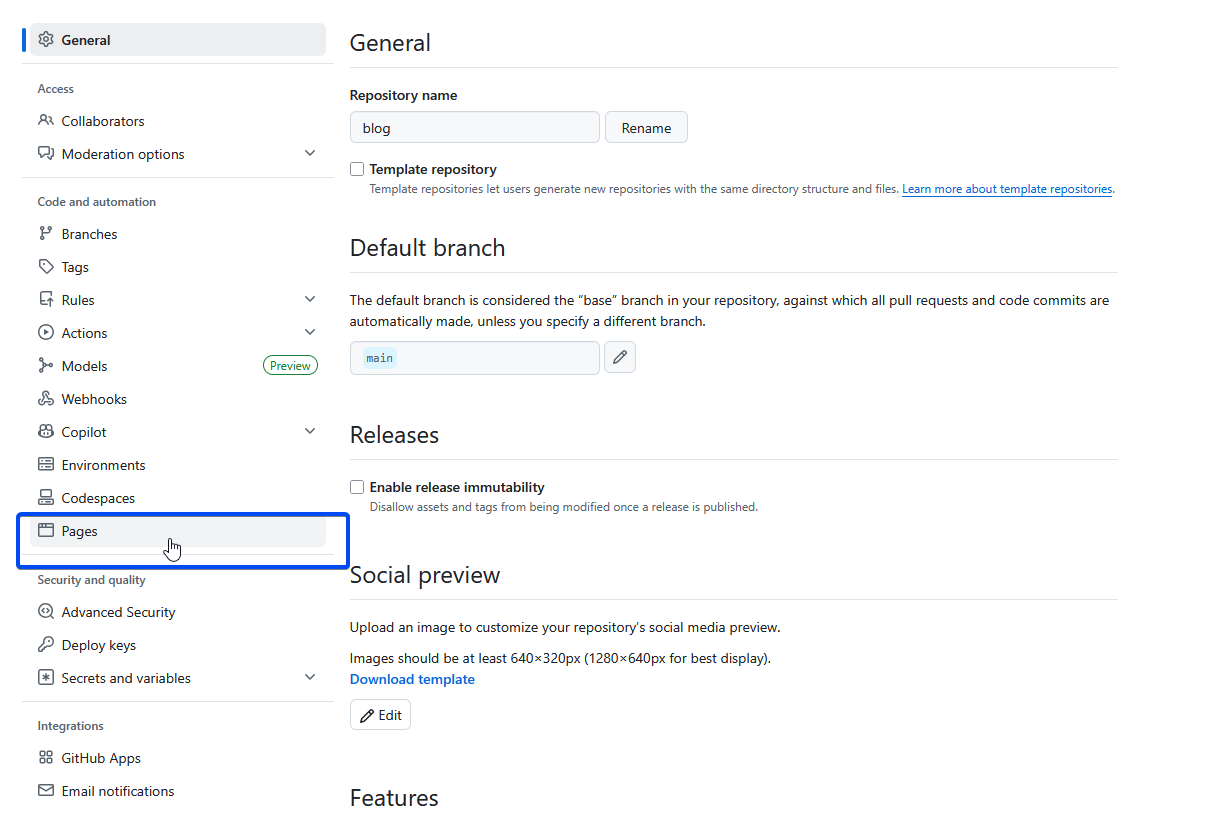
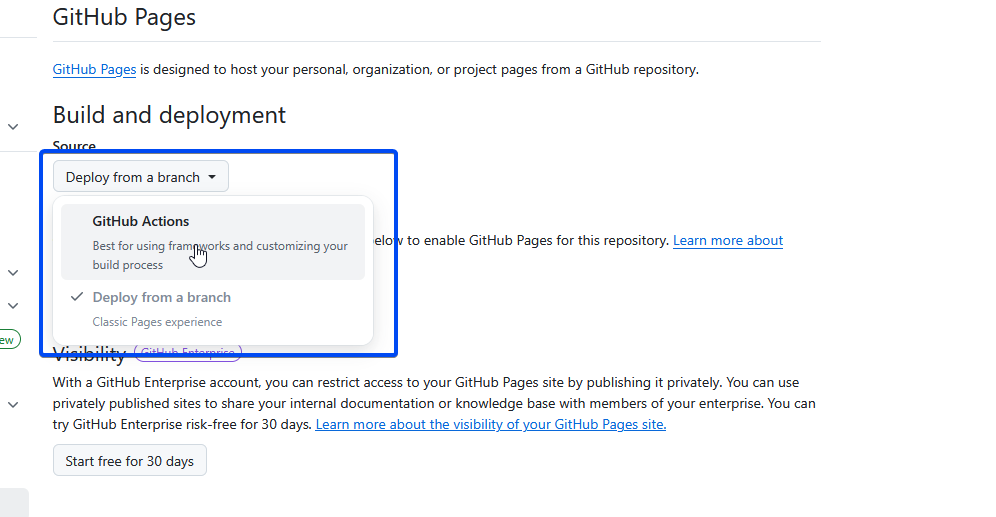
- Change “Source” to “GitHub Actions”
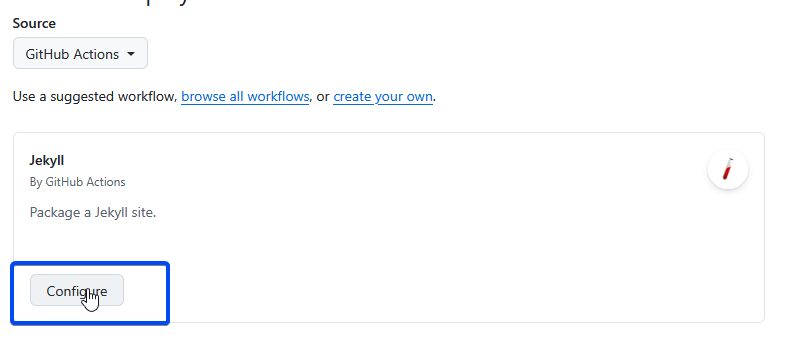
- click the new “Configure” button that just popped up
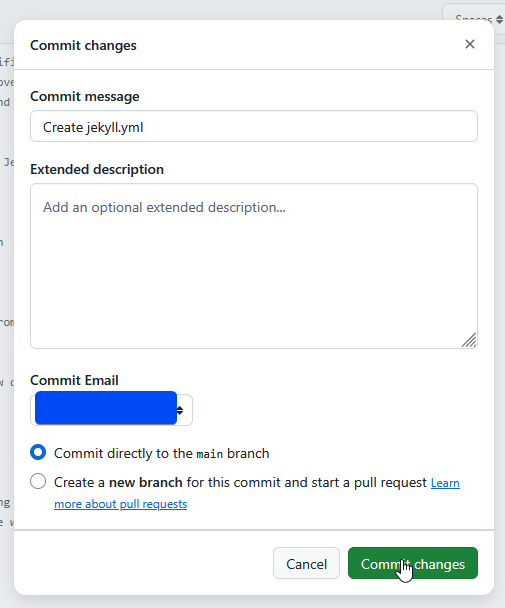
- click “Commit Changes” in the corner (it’s ok if you don’t understand any of this code that just popped up.)
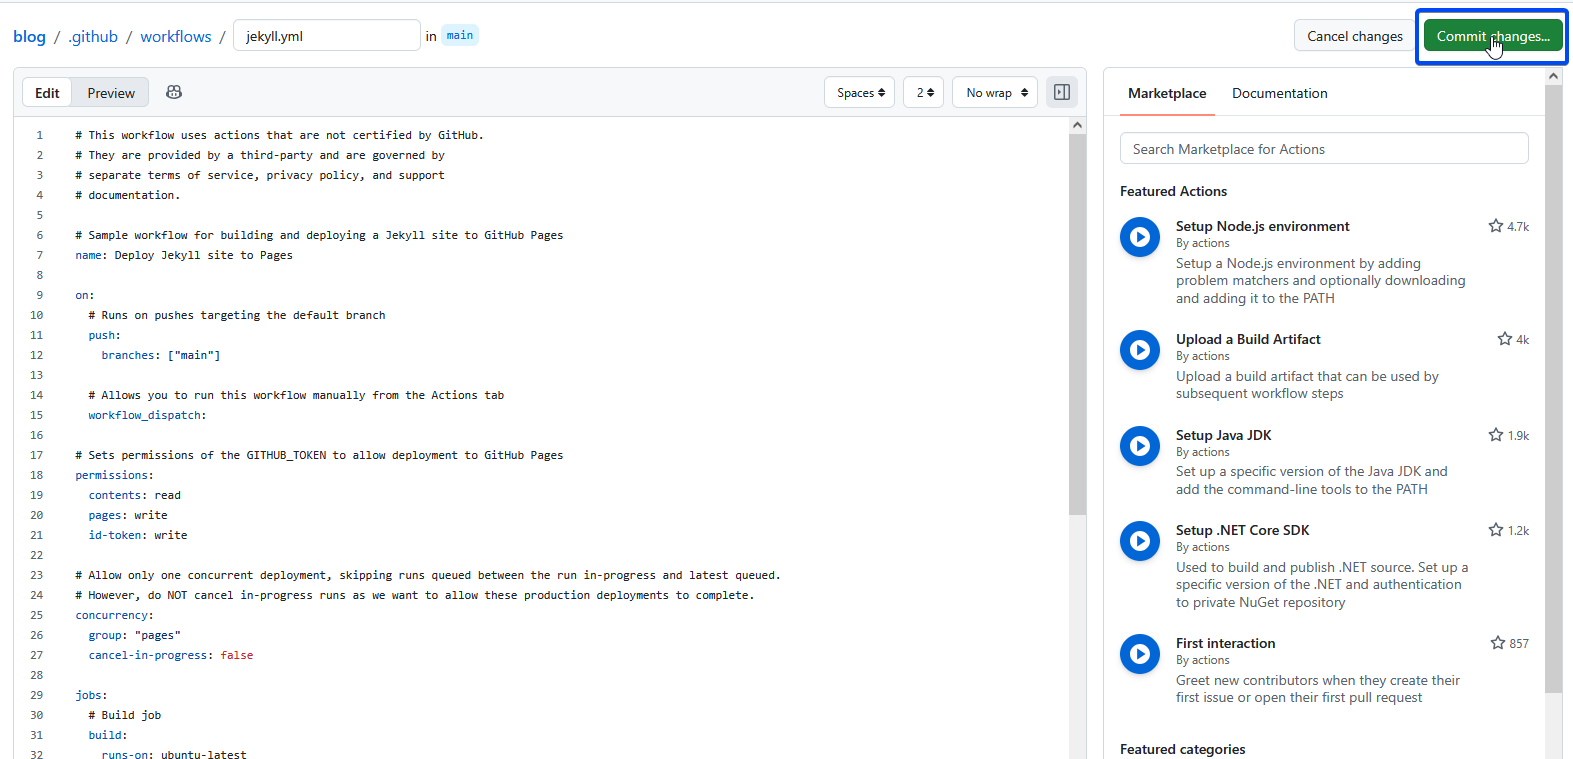
- Confirm by clicking “Commit Changes” again
We made it through! On the page you just returned to, that yellow circle means GitHub is working on publishing your website.
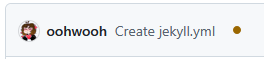
This should only take a minute or two…

Yay! That check mark means your site is now published, and anyone can read it!!
Go check out your site at https://your-username.github.io
Any time you want to publish updates to your site, all you need to do is run the following commands again:
git add .git commit -m "your commit message"git push
Happy blogging!
Next Steps (if you want)
There’s lots you can do with your new blog, in addition to just writing posts.
Jekyll has excellent documentation that can help you customize anything you want about your site. Why not start by picking a theme?
If you want a domain that isn’t your-username.github.io, it’s possible to configure one. GitHub has in-depth instructions on that here. Note that you’ll need to own a domain, I buy most of mine on namecheap.
Domains typically cost about US$10/yr, unless you want to get fancy with it and buy something like https://heylo.la, which will cost you a bit more than that.
Optional Software
I covered the bare minimum you need to get started. These are some extra pieces that make my life easier, and will probably make yours easier too.
Obsidian
I use Obsidian to write posts. It’s a very nice markdown editor and has some quite handy features. Once installed, click “Open folder as vault” and select the folder that contains your blog. (If you followed these instructions to the letter, this will be a folder called blog)
Configuration
I would recommend changing the following settings:
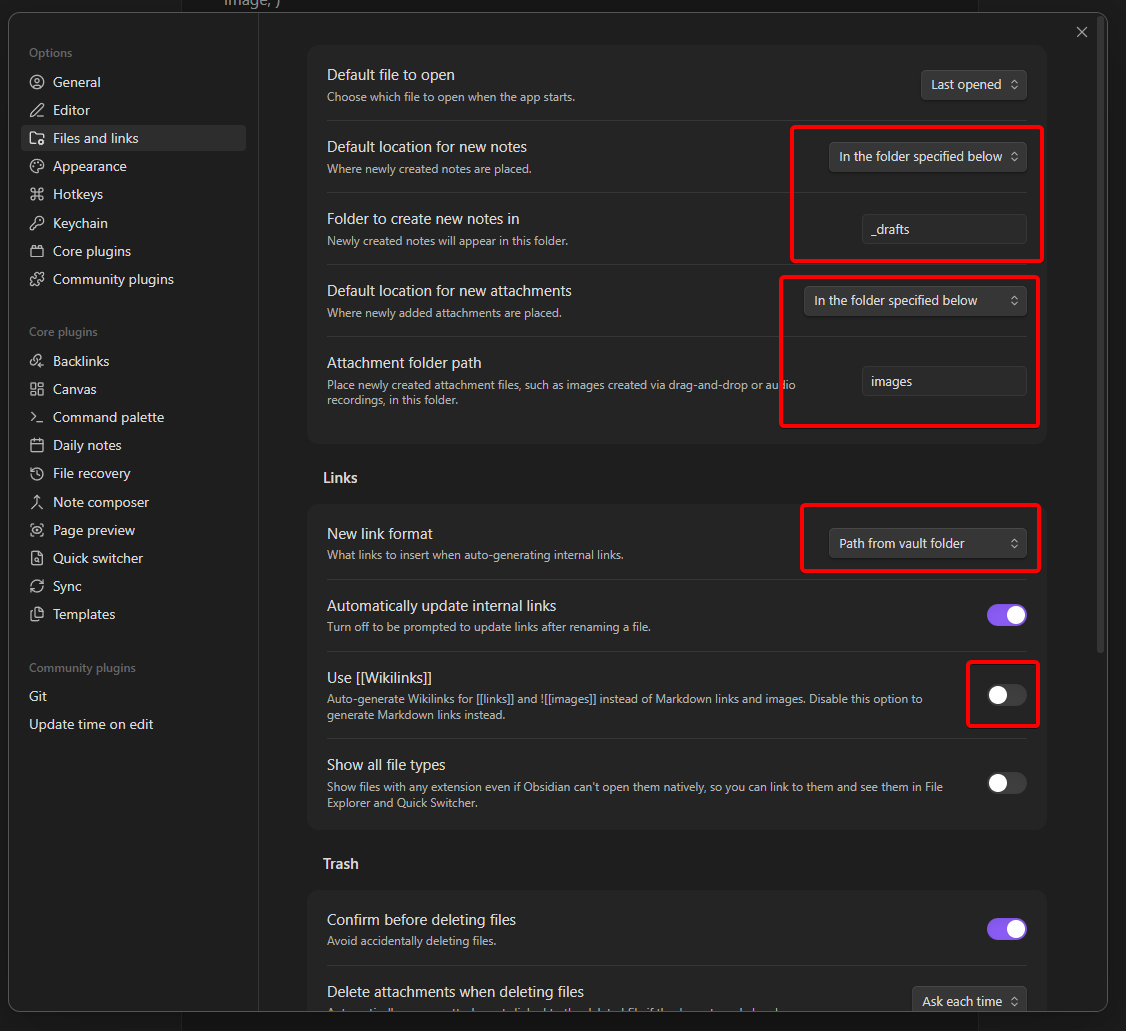 Options -> Files and Links -> Default location for new notes = “In the folder specified below”
Options -> Files and Links -> Folder to create new notes in = “_drafts”
Options -> Files and Links -> Default location for new notes = “In the folder specified below”
Options -> Files and Links -> Folder to create new notes in = “_drafts”
- Setting these are rather self-explanatory, but it means when you make a new “note” (aka a markdown file, meaning a new blog post) it will automatically show up in your drafts folder. You can work on it there and move it to
_postswhen it’s ready
Options -> Files and Links -> Default location for new attachments = “In the folder specified below” Options -> Files and Links -> Attachment folder path = “images”
-
This will keep all your attachments (which are most of the time images) in one folder, to help keep things organized.
-
Note that if you are hosting image-heavy content or otherwise want to host large files on your blog, you might get in trouble with GitHub. You can read more about the limits of GitHub Pages on their website, but the TLDR is as long as all your blog files are less than 1GB in total, you are probably fine. It’s possible to configure external sites to host your images, and use GitHub Pages just for the text content, but that’s out of scope for this article. The term to look up is “CDN” if you want to learn more.
Options -> Files and Links -> New Link Format = “Path From Vault Folder”
- If you don’t set this, Obsidian will auto-generate internal links (for instance, to an embedded image, or link to a different post) that will be in the wrong format. Unfortunately, even with this setting the format will still be wrong, just slightly less wrong. For images you will need to add a
/to the start (i.e.->) Correcting links to other posts is more involved, and looks like the following:[example](_posts/2026-03-31-blog-howto.md)->[example](/2026/03/31/blog-howto.md) - I haven’t figured out a good, simple, solution to this. Granted, I haven’t looked very hard, but if any smart people want to give it a shot and figure it out im sure it’s not too hard to make a Jekyll plugin to correct these link patterns during generation.
Options -> Files and Links -> Use [[Wikilinks]] = off
- Obsidian uses different link syntax, that isn’t supported by Jekyll. Turning this off makes Obsidian output links in a format Jekyll understands.
Community plugins
I also recommend installing the following community plugins
Git - This adds a little sidebar so you can commit and push to GitHub without needing to use the command line. There shouldn’t be any setup required as long as your git is configured correctly and you selected the right folder for your vault.
Update time on edit - This will automatically add fields to the frontmatter for when a file is created, and edited. I have “Front matter updated name” set to updated and “Front matter created name” set to date. By default, the minima theme will only display the date created but it’s straightforward to customize it to make it display the updated date, if that’s something you want.
Visual Studio Code
If you plan on customizing your theme, or making lots of non-markdown changes, I’d recommend an IDE like Visual Studio Code. It’s hard to give specific installation or usage instructions since what you want to do will likely be unique and creative, but VS Code is really popular and it should be easy to find someone else’s blog post teaching you how to use it. Or you can figure it out and write one of your own, now you have a personal blog!